Wednesday, May 30, 2012

Shooting the annular eclipse

May 20th annular eclipse

This year was the first time since 1994 that an annular solar eclipse was visible in the continental US.  An annular solar eclipse is when the moon passes between the Earth and Sun, but the apparent diameter of the moon is smaller than the Sun so a ring, or annulus, appears.  Albuquerque was one of the best places to see this eclipse, falling almost directly on the center line of the shadow's path.  The other unique aspect of this eclipse, besides the annular shape, was the time of day that the eclipse occurred.  The show started about 6:30pm local time, but because of the duration, the sun was still obscured during the sunset.
The May 20th, 2012 annular eclipse path
I knew I had to get some images of this rare occurrence, but without proper protection for the camera, the sun can damage the components inside, just as it can damage a person's eyes if you look directly at it.  They make special filters for cameras and telescopes that block out the majority of the energy, but after doing some research I also found out you can use welder's filter glass as a substitute for these filters, and it is cheap!  Everything I read said to use a #14 welder's filter (the strongest), but after looking at comparisons and not finding any #14 in stock anywhere, I decided I could get away with #12 welder's glass.
I used electrical tape to attach the welder's glass I bought to an old 77mm filter ring I had laying around so I could attach it to my camera
I spent a fair amount of time doing research and looking at images of past eclipses, and decided I wanted something more unique and creative than a simple telephoto shot of the annular sun against a black background.  I really enjoy creating timelapses, because I think they are powerful at conveying a sense of time and story, and while they take a lot of planning and work, the end result leaves me with a sense of satisfaction.    The plan was to do a series of images to create a composite "timelapse" shot of the event after the fact, and also grab some landscape images in between the shots if I could manage.
The setup in the foothills of the Sandia mountains
Terah and I decided to make a date out of the evening and picked up some bbq and beer and headed up to the foothills to find a spot.  It was packed!  All kinds of people were out and about, with tripods and telescopes and homemade viewers and everything in between setup.  Eventually we found a decent spot on a hillside looking west.
The view from our spot.  I was worried about the hill on the right blocking the end of the eclipse, which it did, but it turned out to be a good thing
I used a intervalometer remote attached to the camera to take my sequence of images.  I started 3 minutes before the start of the eclipse, and took an image every two and a half minutes.  The filter I made did a good job of blocking the light, giving me exposures at ISO100, f11 of 1/1000 of a second.  
The final composite sequence of the May 20th, 2012 eclipse
In the final composite sequence image I put together, I ended up not using every image I took, it was too cluttered for my liking with a shot every two and a half minutes, so it shows the sun at five minute increments.  We had a lot of time to waste, so I did some experiments using my iphone camera:
iphone shot, notice the small eclipse shaped reflection

iphone shot using the welder's glass filter to shoot through

iphone shot, taken when the full annulus was showing, which shows up in the reflection on the right
I did switch over to my telephoto lens several times during the eclipse to get a few zoomed in shots of the eclipse, mainly during the full annular duration.  Because I don't have a 2nd body, this was a fun excercise in frantic lens swapping that Terah helped with.  We were able to do it within the two and a half minutes between sequence shots without moving the sequence tripod at all!
I knew going in silhouette images would be my best bet, and they didn't disappoint
The hill I was worried about when we first set up at our spot turned out to be a blessing.  It was obvious as the eclipse continued that the hill would block a portion of the event from where we were, but when that happened I switched to my telephoto lens and was able to get some great shots of the watchers up on the ridge.
Lots of activity up on the ridge

A few remain on the ridge as the eclipse starts to set
Eventually we headed down the hill and back towards our home, and with the unobstructed view of the horizon, we got one last peak at the setting eclipse sun.
Goodbye Mr. Eclipse
It was such an awesome experience shooting and watching the eclipse on May 20th.  Definitely lucky to have been in the path for this one, I know lots of friends who weren't so lucky.  The good news is, in 2017 a total eclipse will be visible over large portions of the continental US, with prime viewing locations in the rocky mountain and great plains regions, so make your plans now!

Friday, May 18, 2012

The Smoking Lightbulb

The Smoking Bulb
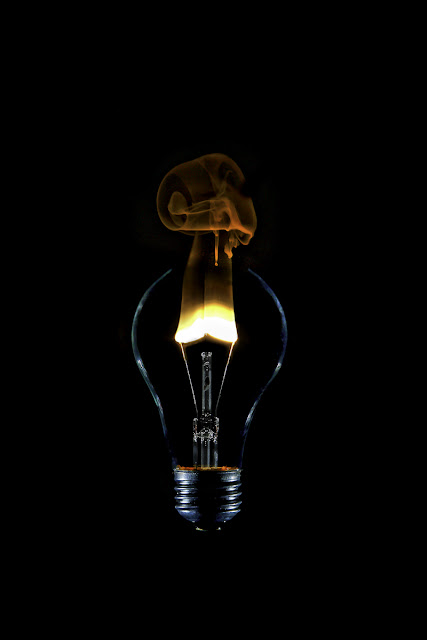
Earlier this week I posted this image to facebook and got lots of interest, and some questions on how it was done.  This offered the perfect opportunity for a giveaway contest, something I've been wanting to do for a while on my facebook page!  I'll get to the winners of the 16x20 print giveaway at the end of this post, but first I'm going to explain what went into the creation of this image.

 I had a lot of fun conceptualizing, planning, shooting, and editing this image, and I am really happy with how the final turned out.  I think it began with an image I saw on flickr of a broken light bulb going up in smoke, but it didn't have much artistic appeal to it and I didn't like the broken glass really.  I wanted to create an image that seemed to defy what you knew about light bulbs, and one that was minimalistic but striking.

Your typical incandescent bulb works by flowing electricity through the filament, glowing to give off light.  The bulbs are filled with an inert gas or evacuated, which prevents the hot filament from reacting with oxygen to combust.  All I needed to do to get one to burn up was remove or break the glass to let the oxygen in.  I bought half a dozen clear light bulbs from home depot as well as a work light.  These lights are cheap, are easy to attach with the clamp, and allow you to remove the reflector dish to get just the bare bulb, exactly what I wanted.
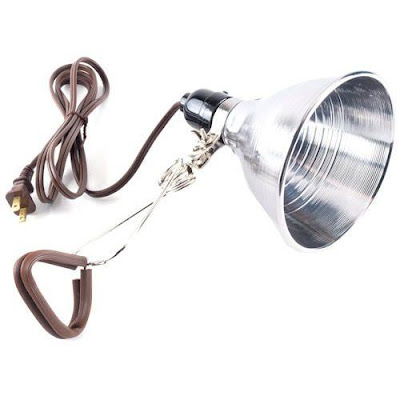
6" work light from home depot for $7
I quickly found out that breaking the glass on the bulb without breaking the thin filiament inside was not a trivial task.  I tried several times to use a small hammer to break a small hole in the very top and each time the shattered glass took out the filament with it.  I eventually used pliers near the base of the bulb, squeezing tightly on the glass, and got several successful bulbs with the glass removed.  If you do this, put the bulb and pliers inside a plastic bag so all the glass is contained, it makes clean up a breeze.  I kept one complete bulb to photograph as well.
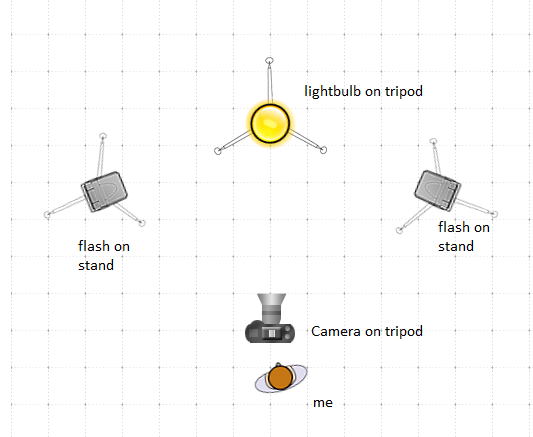
Lighting diagram for the light bulb shots

The lighting setup is straight forward.  I used two bare flashes on lightstands and set each to manual power, so I could adjust after each shot.  I zoomed the flash heads in to 105mm to avoid spill light anywhere else in the room and get that harsh light I wanted.  I triggered them wirelessly using the pop up flash on my 7d.

The settings I started with on my camera were manual mode, 1/250 sec., f16, ISO 200, flash WB.  I used my Canon 7d with the EF 24-105 f4L lens on it, zoomed all the way in to 105mm and manually focused on the bulb.  Because the flash sync speed for my camera is 1/250, I could not go any higher than that for my shutter speed.  These settings gave me a completely black room without any flash, which I wanted to get the black background.  After I made sure I had the black background, I adjusted the flash power output to get the lighting on the bulb I wanted. 
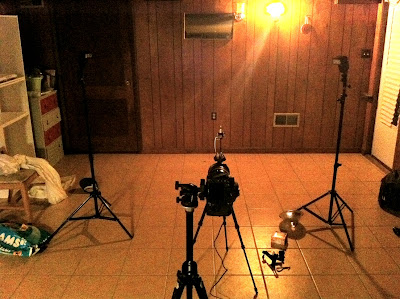
My "studio" - the sunroom in our house.  (Iphone shot)

I spent about half an hour photographing the complete, unbroken light bulb. I used double stick tape to hold the bulb in place on top of the tripod.  After I was happy with the variety of shots and lighting in the images I captured of the complete bulb, it was time to move to the bare bulbs!

For this part, I turned off the flashes, as the flame from the burning filament is enough to light up the smoke.  The combustion of the bare bulb filament takes only a few seconds, so I switched to high speed shutter mode, 8 frames per second.  I plugged the work light into a power strip that had a on/off switch, and used a cable release to start shooting.  As soon as I started shooting, I flipped the on/off switch on the power strip, and the bulb went up in smoke.  Each bulb is worthless afterwards.  I did three tries at it.

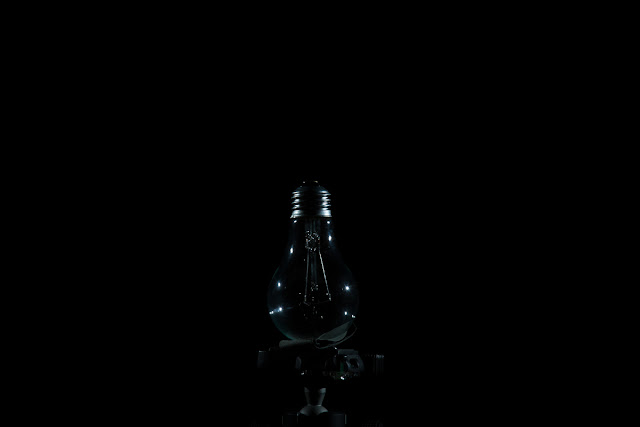
After going through all the images (I shot over 300!) I narrowed them down to 4 images that I thought would be the best to use to composite together for what I had in mind:  bulb outline, bulb socket, bulb stem, and the flaming filament.  The four images I started with are shown below.
The outer edge of the bulb

I used this for the bottom socket, to replace the work light

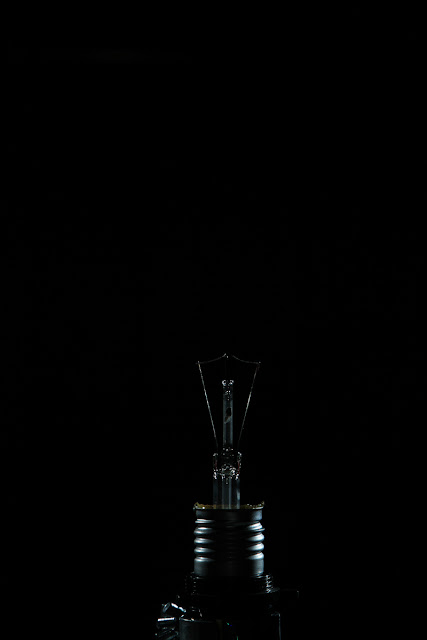
I liked the inner stem on this one better than when it was lit from the flame
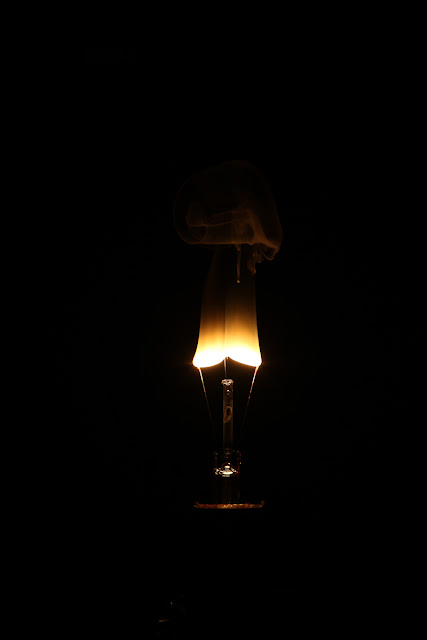
And finally, the burning filament shot, with the smoke above
After adding each of these into separate layers and lining them up, I added masks to hide the parts that I did not want.  I had the composite shot I wanted, but it needed some tweaking to make it pop.  I added additional layers to bring out the smoke, the detail in the glass and the socket, clean up the glass outline, and enhance the color of the glass, smoke and flame.  I happened to use plugins I have for photoshop to do this (Nik Color Efex and Topax Adjust) but these things could have easily been done with adjustment layers in photoshop if I did not have those plugins.  Finally, I did some cleanup to remove blemishes and cropped the image from horizontal to vertical.

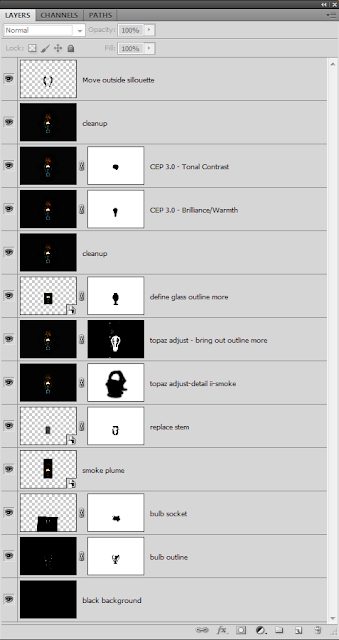
The layers panel from photoshop once I finished the image.  13 layers total.
So who won the contest to guess how this was done?  There were lots of responses, and all of them were great!  Some guessed a single image, with extensive photoshopping, others thought I used a candle to get the smoke, and hid it behind the light bulb.  Several people guessed correctly that this was a composite of at least two images, it would have been very difficult, although not impossible (if I could successfully break a small hole in the top) to do it without multiple images.  The gap in the top of the glass outline was achieved using the lighting setup at bulb height, 180 degrees apart and not a photoshop edit.

This animated shows the different layers used to create the image, from black background to completed image


Sarah Kannenberg, Elaina Porter Janes, Kelly Gentz, and Jacob Rice all had great guesses that came really, really close, but the winner has to be Justin Vallely with this response:
I'm guessing you have multiple images layered on top of each other. At least 2 images.

Photo 1: Normal clear glass bulb, 2 flashes (1 on each side, 180 degrees apart). This provides the image for the glass and base. Photoshop might have been used to erase the glass at top dead center.

Photo 2: Same bulb with the glass broken/removed. Being exposed to oxygen now without the glass, the filament should burn when switched on. Base of the bulb in a fixture is photoshopped out, glass stem and burning filament are all that are left. No streaking and no "star bursts" so I'm guessing large aperture, quick shutter.
 Congrats Justin, I'll email you details of how to order your print.  Thanks to everyone for participating, I will definitely be doing another contest in the future, so stay tuned.  Hope everyone enjoyed the detailed description of this image as much as I enjoyed creating it.  Did I forget to cover something?  Leave a comment and I'll address it.

Happy Shooting!

Friday, May 4, 2012

Tips for getting exciting, sharp action shots

Besides doing photography for my own personal enjoyment and the occasional wedding or portrait session, I have worked for a local company for the past 4 years taking youth sports photos.  Every spring and fall we shoot the local soccer clubs team and individual shots, and while it is not terrible pay, it is not the most thrilling thing to shoot as a photographer.  Lately we have been trying to get into covering the soccer tournaments shooting action shots, a much more exciting subject for us photographers and something a lot of kids and parents can get excited about too.
 Sports photography at first might sound easy, but it quickly becomes apparent how difficult it can be.  Even the best photography gear out there does not take the user out of the equation. Below are some "best practices" to help get great shots of your kids or others. 

- If your camera has it, work in manual or shutter priority mode.  For a typical sunny/partly cloudy day, a good starting point is 1/1000 sec, f4, ISO 100.  Depending on what lens you have, you will have to vary this.  Your shutter speed should always be 1/500th or faster to ensure freezing the action.
- Shoot as wide open as you can to get that shallow depth of field.
- Most cameras have a couple of different focus methods.  You want the tracking mode, on canon cameras this is AI Servo mode.  This mode will actively search for moving subjects and keep focus.

- Use a monopod if you have one.
- Wear sunscreen. :)
- Shoot with the sun at your back so it lights up the kids.
- I like to position myself about 20 yards from the goal line on a side.  This lets you get good shots of both sides of action.
- Use the longest telephoto you have.  If you have a tele-converter, use it too.  For these, I used my 70-200 f2.8 with a 1.4x tele-converter, which cuts 1 stop of light so it becomes f4.  The longer the focal length and smaller your F number, the more separation you will get from your background.
The Canon 7d auto-focus modes
- Every camera has a slightly different auto-focus system, so it is hard to generalize what to do, but I'll go over what I use on my Canon 7d.  There are 5 auto focus modes available on the 7d, covering almost the entire frame down to a single point in the frame.  I have tried the Automatic AF selection before with mixed results.  I think this is too broad an area for the camera to work with, so it has a hard time determining what you mean to focus on.  Similarly, the single AF point is too focused.  Kids are unpredictable, and I'm not good enough to keep that small point on them the whole time.  I use the AF expansion mode, which uses a selected AF point and adds the 4 points around the outside of it.  This gives you some room to play with, if you keep the center point on the child and it moves suddenly to one of the neighbor points, you won't loose focus.  Play around with your camera to decide which one you like best.
 - If you use a single AF point or AF expansion like mentioned above, use the center AF point and always center the action.  There are two reasons for this:  first, it keeps the action in the center of the frame and cuts down on the number of shots that will be cut off near the edge of the frame, and second, the center AF points are always the most accurate.
- I like to use single shot shooting mode with kids.  The reason I do not use the high speed (8 frames/sec on the 7d) mode is because it fills up the memory card extremely fast and I do not really have the need to catch that "cover photo" like moment in these shots.  I'm not trying to get on the cover of Sports Illustrated, I'm just trying to get a photo that shows the child in motion really.  Keeping my eye up to the viewfinder and following the ball, I got really good at anticipating the kick or the shot or whatever was going to happen.  Try both methods and see what you like.
 - Speaking of looking through the viewfinder, keep both eyes open.  It helps you be aware of what is going on outside the frame, and after not too long squinting with one eye through a viewfinder, your eyes will start to revolt.
- Shoot in the vertical orientation.  A battery grip really helps out with this.
- Finally, be courteous to the refs, linesman, and other parents.  No one likes a photographer who gets in the way ;).

Happy Shooting!

Tuesday, March 27, 2012

Return from Las Vegas Trip - Lower Antelope Canyon

Curves of Lower Antelope Canyon
I love living in the Southwest.  As a photographer, I don't think there are many other places in the world that offer such a diverse array of exciting, interesting, unique, and amazing locations to shoot.  This is especially true if you like shooting landscapes.  There are deserts, mountains, lakes, canyons, waterfalls, sun, storms, snow, trees, clouds, and on and on, and the vastness of it all seems a little bit greater in the Southwest. 

None of this prepared me for my first trip to Antelope Canyon.  I have wanted to go to a slot canyon for several years now, ever since I got serious about photography.  Slot canyons are well known to landscape photographers, one of those jewels that seem to be a badge of honor on your list of credentials, as if you can't call yourself a landscape photographer if you haven't been to one.  I do not really believe that, but nonetheless it is something that I had high on my list.

Antelope Canyon map.  Page, AZ is on the left, the facility on the right is the Navajo power plant, and right where the orange pin is is the start of the canyon, which goes north from there
Antelope Canyon is generally regarded as the best slot canyon around.  It is actually two separate canyons, an Upper and Lower, on Navajo Indian land just outside of Page, AZ.  The Upper is the more popular, and there are stories out there of people packed shoulder to shoulder going through it.  Not what I was looking for if I want to take my time and get some images.  The lower canyon is just across the road from the other, longer, and has fewer visitors due to the fact it has several levels to it and requires navigating some stairs and ledges.  They also offer a photographer's pass at the lower canyon, which allows you free roaming access for up to 2 hours inside.  Makes my choice an easy one.

The entrance to Lower Antelope Canyon (Iphone shot)
After I paid my admission fee ($26), a guide led me to the entrance.  He explained the rules (no food, littering, climbing, defacing, urinating, etc.) and told me how the canyon is considered sacred to the Navajo people.  He stopped in the middle of a sand arroyo and pointed me to a small crack in the ground, and said have fun.  I could not believe this was the entrance!  Just a small crack in the ground, barely big enough to squeeze through, but after taking the first flight of stairs down, it was obvious what the draw was.  From the outside, one would never expect to find such beautiful shapes and colors down below.
Lower Antelope Canyon path
 The canyon, like most canyons, is formed by water, the rainwater from summer thunderstorms that washes down the hills and forces it way into the cracks.  As a result of how narrow the slot canyons are, flash flooding is a major safety issue.  In 1997, 11 people died in a flash flood in this very canyon when the thunderstorms came too quickly and they couldn't escape the canyon in time.  Since this tragedy, strict guidelines have been put into place for when to close the canyon and safety measures are throughout, including water rescue boxes along the top that have rope and other life saving gear inside.
Lower Antelope Canyon, looking up from the bottom
Photographing inside is amazing.  Almost every direction you look there is a new angle to capture or a new formation that intrigues.  In general, tripods are a must, most of my exposures were a couple seconds long.  Even looking up, the colors and shapes are beautiful, as long as you avoid getting what would turn out to be a very blown out sky in the frame.
Just a hint of sky in Lower Antelope Canyon
There were a few people that came through while I was inside, but everyone was courteous and we all took turns taking pictures for others or getting out of the way of a shot.  I was in the canyon from about 10:30 till 12:00 in the morning, and the light was fantastic.  Because of the depth of the canyons and the small openings at the top, the best time is during midday, exactly the opposite of your typical landscape hours. 
The canyons are carved out of red sandstone, and constantly changing
 During certain times of the day, the canyon can have light beams shinning all the way down to the canyon floor.  These light beams are a very popular photographic subject, but I was too early in the year to get these, which are best in the summer months right around noon.  Throwing a handful of sand in the light beam helps to make it stand out, and can lead to some very dramatic images.  Just means I'll have to go back some other time!
A natural arch that has been formed in the canyon
Distant walls of the canyon play peekaboo through this keyway
I had a fantastic time inside Lower Antelope Canyon.  There is an abundance of slot canyon images out there, and now I can add mine to the mix.  While it is not a totally unique location because of it's popularity, shooting the slot canyons is more than just getting some images of something no one else has seen.  It is an experience, where each turn of the corner in the canyon provides a new, fantastic perspective to take in and capture for myself.  Being inside the magical place, one so hidden from above, is what I cherished about the experience, and the images I brought back are just an added benefit that I can share with others who have not had the pleasure of experiencing the slot canyons.

Happy Shooting!

Friday, March 23, 2012

Return from Las Vegas Trip - Horseshoe Bend

Horseshoe Bend in the morning near Page, AZ
Horseshoe Bend is one of those places that has been visited and photographed by so many people, yet if you have the chance, you must go and see it for yourself.  The bend itself is where the Colorado River makes a full 180 degree turn around a bluff, with sheer canyon walls all around.  It is just outside Page, AZ, south of Lake Powell about 10 miles and North of the Grand Canyon.

There are varying opinions and tips on when to shoot Horseshoe Bend.  I read about shooting it in morning light, midday light, afternoon light, at night, at dusk, at dawn, and on and on.  The deep canyon walls make for some tricky lighting conditions, and HDR or exposure blending is a common method for dealing with this.  After reading up, I decided to head out to the location and capture Horseshoe Bend in the early morning dawn, before the sun came up. 

I had one small hiccup with this plan.  I used "The photographer's ephemeris" app on my iphone to look up the time of the sunrise for Monday, March 12th in Page AZ, 6:40 AM.  I woke up at 6, grabbed my gear and some drinks and snacks and headed down the road from my hotel about 10 miles to the turn off for the trail.  Along the way I noticed it was still pretty dark out, no signs of the sun coming up, but the sky was overcast and I figured I just needed to give it some time.  I brought a flashlight with me and began the hike, which was a little scary in the dark, as I had never been on the trail before and couldn't see more than 30 ft. in front of me.  Knowing somewhere ahead was a shear cliff with a dropoff of several hundred feet, the darkness was not my friend.  I eventually made it to the edge of the cliff about 6:20 AM, and still no sign of the sun. 
Setup ready to get some shots (taken with iphone)
 So I waited, and waited.  Finally as I was looking on my iphone I realized that the sunrise time I got from the app had not taken into account the change in daylight savings time that had occured the day before!  I was an hour early for the sunrise.  So I waited some more.  I heard lots of wildlife sounds during the wait, including an owl nearby and several different coyote howls in the area.  A little spooky, but at the same time it was such a peaceful wait I had, no people or buildings around, at such an amazing spot, surrounded by nature.  Eventually the Eastern sky started to lighten and I was able to scout the area and see the full scale of Horseshoe Bend.  Breathtaking! 

Eventually, several other photographers made their way down the trail, and we all claimed a spot around the rim of the cliffs.  Horseshoe Bend is a place that doesn't lend itself to a variety of angles and different shooting positions.  Because of the size of the bend, almost every image I have seen of it is taken with a wide angle lens to get the whole scene in the frame.  After all, just getting part of the river in the frame would not make a unique image, it would just be a picture of a river! 
The view to the East of the sunrise, with Horseshoe Bend directly behind the camera
 I spent the next hour or so taking a variety of shots.  We were all hoping for the sun to peak through the cloud cover and light up the Vermillion Cliffs, off in the distance behind the Bend, with some nice warm morning light, but we had no such luck.  There was some nice light off in the distance though towards Lake Powell though, which I spent some time shooting with my telephoto lens.
Morning light looking towards Page, AZ and Lake Powell

Looking back down the trail at Horseshoe Bend from the top of the trail (taken with iphone)
My visit to Horseshoe Bend was fantastic, and if you are in the area you have to go.  It is a truly unique Southwestern destination, and something you have to see with your own eyes.  Next up is a post on Antelope Canyon!

Happy Shooting!

Tuesday, March 20, 2012

Returning From Las Vegas Trip - Zion National Park

The route I took back from Vegas to Albuquerque over 2 days, with a stay overnight in Page, AZ
My wife and I were in Vegas for the MWC basketball tourney recently (Go Lobos!).  After spending three days there, she was going to go visit her family in California for a week, so I had a few days to spend returning to Albuquerque and decided to make a photography trip out of it.  After doing some research and planning, I decided five places on the way back I had never had a chance to photograph but had heard so much about:  Valley of Fire State Park in NV, Zion National Park in UT, Horseshoe Bend and Antelope canyon near Page, AZ, and Shiprock in NM.  What a trip it was, 759 miles, loads of photography, and some very desolate, beautiful places!

I headed out Sunday morning and drove through Lake Mead Recreational Area and Valley of Fire State Park.  Cool places, stayed tuned for more on them later, but my big fish for the day was to get to Zion by mid afternoon and have some time to do a hike or two.  I finally made it around 3pm, and couldn't wait!  I had not done any serious photography since the beginning of the year, so I was itching more than usual to get some shots.
Panorama just inside the park entrance.  The actual Zion Canyon, where the scenic drive and hiking trails are, is right in the middle
 Zion is one of the best national parks to hike in, with over 20 trails easily accesible and many other backcountry hikes waiting for the more adventurous.  I took the short scenic drive back into the canyon until I could not go anymore, and headed off on the riverwalk hike, an easy paved trail along the Virgin River in some of the most scenic parts of the park.
Zion canyon and the Virgin River
I spent the next two hours exploring the canyon along the trail and setting up numerous shots.  This time of the year is not the most scenic per se, with spring not yet kicking in so all the trees are barren, but the scenery was breathtaking nonetheless.  A tripod was a must for this, most of the canyon is in deep shadows and requires long exposures and/or exposure blending several shots together.  There were quite a few people out in the great weather, mostly families and lots of small children.
Near the end of the hike the river had a series of small waterfalls and gentle pools
Close-up of a series of waterfalls along the Virgin River
I finally came to the end of the trail, which is also the start of a new hike and area called "The Narrows".  The Narrows is probably the most well known hike in the park and entails hiking for large portions in the Virgin River, which winds through an increasingly narrow section of the canyon wall-to-wall.  Wetsuits and special gear is required for this hike, and it is strenuous considering the loose footing and battling against currents of the river.  It is on my bucket list now after seeing part of it in person!
The beginning of The Narrows in Zion National Park
Once I got back to the car, it was 5:30pm and I still had a 3 hour drive to Page, AZ that night, so this was the only hike I got to do unfortunately.  I would have loved to have more time in the park to explore, but enjoyed the couple hours I did get and am looking forward to going back in the future. 

Up next, I'm working on separate posts for both horseshoe bend and Antelope Canyon.  Stay tuned for these soon!

Happy Shooting!


Monday, February 20, 2012

Tips and tricks for shooting lightning


Recently I posted the above image on my 500px.com site (http://500px.com/BeckmannImages) and got a lot of activity, with over 1300 views, 38 likes, and a peak rating of 96.  This image is one from a outing I took last summer during a particularly intense lightning storm here in the Albuquerque area.  I got several other great shots from the trip as well, and have been out a handful of times to shoot lightning with, what I think, are great results.  The key to getting some great lightning shots is preparation, patience, and some luck.  It's not hard to get some shots of the lightning due to the long exposures used, but an eye for composition goes a long way in making great shots as well.

First, let me talk about exposure settings.  If you sit around waiting for a lightning strike and hope to press the shutter and capture it as soon as your eye sees it, forget it.  Besides missing the strike, you will get tired very quickly sitting with your eye to the camera and your finger on the button.  You want to leave the shutter open as long as possible to give yourself a chance at capturing the strikes.  Don't worry about overexposing too much, that is where the f-stop and ISO can help.  I usually default to a 30 sec. exposure, but you can play around with anything from 10-30 sec. or longer.  On a particularly bright night or around lots of city lights, the shorter durations might help control blowing out areas of the image.


The next thing you want to set is your f-stop.  Two things to keep in mind here.  You want to balance the depth of field you get (depending on your composition and what is in the foreground) with the amount of light your lens is going to let in (lower f numbers let in more light, and vice versa).  Most of the time, you want something in the middle, say f8 to f11.  Start with something, do some shots, and then check your depth of field to see if you need to go higher in f stop to increase the DOF.

Finally, set your ISO.  This should be kept as low as possible, say ISO 50-200.  Because the shots are long exposures, the noise is going to be an issue to watch out for, and higher ISOs only make the noise worse.  You can do some things (such as in-camera noise reduction or post-production noise removal) to get the noise down, but you want to start with a good base.

As is always the case in photography, none of this is set in stone.  The key is to start somewhere, say 30 sec., f8, ISO 100, and adjust accordingly.  I also want to point out here, this is by no means only possible with a dSLR camera.  Many point and shoots allow you to set your ISO and adjust your shutter speed.  While you might not have control over everything mentioned above, It is certainly possible with some experimenting to get good lightning shots with any camera.

Other camera settings.  You can play around with the white balance, I find the cloudy or tungsten settings to be the best but you might be pleasantly surprised with the colors you get from another setting.  If you can, pre-focus your camera and then turn auto focus off.  You don't want the camera searching for focus or worse not being able to focus at all if it is really dark.  You can experiment with long exposure noise in-camera, I personally don't use it because I don't like to wait the extra time it takes, but if your shots are really noisy this will help. 


Other things you will need.  A tripod.  Besides the camera, this is the most essential piece of equipment.  In a pinch you can try balancing your camera on a wall or something stationary, but with the long exposure times it has to remain still for a nice crisp shot.  Another very handy piece of equipment is a remote or shutter release cable, which keeps you from bumping the camera when pressing the shutter button.  Alternatively, you can use the timer function on your camera to set a delay from when you press the button to when the shutter is opened.  A flashlight is also a must.

Because of the dangerous nature of thunderstorms, make sure you are prepared for whatever the weather might throw at you, and consider the area you are setting up in and where your nearest shelter might be.  For the storm I mention above, lightning was going off all around, and taking shelter in the car during shots was a must.  Eventually I even pulled my equipment inside the car and shot from there so I wasn't out in the elements.

Finding the perfect location.  This is what sets good lightning shots apart from great ones, location and the "other stuff" within the frame.  Lightning is a pretty dramatic thing by itself, but there are a couple things you can do to add to that, and several mistakes that certainly take away from the lightning itself.  Stay clear of power lines, bright street lights, strip malls, street signs, and generally anything that gives the image a urban or city feel.  Lightning is a natural phenomenon, and having street scenes or power lines takes away from this natural awe and distracts the viewer from the main attraction, the lightning!  Obviously, there are always exceptions to the rules (like the shot of the casino above), but getting outside of town or in an open space area gives so many more options for your creativity to show itself and your image to wow.  Frame the shot with mountains in the background, or take a shot from afar and show the scale of the storm with respect to the city lights or some other feature.  Lightning is powerful, amazing stuff, and the more you can do to show this power and drama rawness the more dramatic the reaction will be from those who view your image.

Spring is approaching and those thunderstorms aren't far away, get out and get some great lightning shots!  I'm working on a separate post about some post-processing techniques I use for lightning shots, stay tuned!

Happy Shooting